Tuesday, January 25, 2011

Free Crochet Pattern: Buzzy Bee


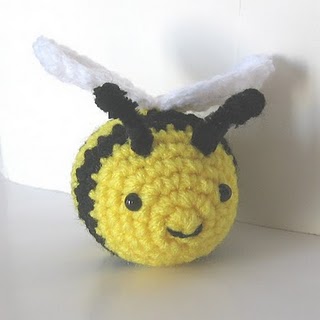
My sons asked me to make them a bee so here is what I came up with:

Materials:
- Crochet hook E4 / 3.5 mm
- Worsted weight acrylic yarn in yellow, black and white
- Polyester fiberfill
- 6mm black safety eyes
- Yarn needle
- Sewing needle
- Black pipe cleaner

Bee:
With yellow yarn
Rnd 1: 6 sc into a double loop start and pull the loop closed (6).
Rnd 2: 2 sc in each sc around (12).
Rnd 3: [Sc in next 3 sc, 2 sc in next sc] 3 times (15).
Rnd 4: [Sc in next 4 sc, 2 sc in next sc] 3 times (18).
Rnd 5: [Sc in next 5 sc, 2 sc in next sc] 3 times (21).
Rnd 6: [Sc in next 6 sc, 2 sc in next sc] 3 times (24).
Switch to black yarn
Rnds 7-8: sc in each sc around (24).
Pause to attach eyes between Rnds 3 and 4.
Using a length of black yarn split down to 2 ply and a sewing needle, stitch mouth onto Rnd 1.
To make antennea, cut a black pipe cleaner in half. Cut a length of black yarn and tie and knot it around the center of a piece of black pipe cleaner a few times. This will create a little ball at the tip of the antennea. Bend the pipe cleaner in half and insert the ends into the bee's head between Rnds 5 and 6. Leave about 1"-1.5" of the antennea sticking out of the bee's head. With the pipe cleaner that is inside the bee's body, bend the two pieces at a 90 degree angle to anchor the antennea in place. For added strength, you may want to stitch the pipe cleaner "tails" to the bee's body using a length of yellow yarn. Repeat with other half of the pipe cleaner for the other antennea.
Switch to yellow yarn
Rnds 9-10: sc in each sc around (24).
Switch to black yarn
Rnd 11: sc in each sc around (24).
Rnd 12: [sc in next 2 sc, sc2tog] 6 times (18).
Switch to yellow yarn
Rnd 13: sc in each sc around (18). Stuff.
Rnd 14: [sc in next sc, sc2tog] 6 times (12).
Switch to black yarn
Rnd 15: [sc in next 2 sc, sc2tog] 3 times (9).
Rnd 16: [sc in next sc, sc2tog] 3 times (6).
Finish off leaving a 6" tail. Weave tail through remaining 6 sc and pull up firmly to close the hole. Weave in ends.

Wings:
With white yarn
Rnd 1: 6 sc into an adjustable ring and pull the ring closed.
Rnd 2: 2 sc in next sc, 2 hdc in next sc, 2dc in next 2 sc, 2 hdc in next sc, 2 sc in next sc (12).
Rnd 3: [sc in next st, 2 sc in next st] 2 times, hdc in next st, 2 dc in next st, dc in next st, dc and hdc in next st, [sc in next st, 2 sc in next st] 2 times (18).
Finish off leaving a tail for sewing. Sew wings to bee. Weave in ends.

Monday, January 24, 2011

My favorite free patterns: Love Bunnies

Okay, so lately it seems like I'm more than a little obsessed with Valentine's Day and bunny rabbits. But this free pattern that I found was so darned cute that I had to make it. I modified the pattern a bit to make the bunnies a tad smaller as follows:

Head:
Rnd 1: 6 sc into a double loop start and pull the loop closed (6).
Rnd 2: 2 sc in each sc around (12).
Rnd 3: [Sc in next sc, 2 sc in next sc] 6 times (18).
Rnd 4: [Sc in next 2 sc, 2 sc in next sc] 6 times (24).
Rnd 5: [Sc in next 3 sc, 2 sc in next sc] 6 times (30).
Rnds 6-10: sc in each sc around (30).
Rnd 11: [sc in next 3 sc, sc2tog] 6 times (24).
Rnd 12: [sc in next 2 sc, sc2tog] 6 times (18).
Pause to attach safety eyes (I used 6 mm) and sew an "x" for a nose.
Rnd 13: [sc in next sc, sc2tog] 6 times (12).
Stuff head
Rnd 14: [sc2tog] 6 times (6).
Finish off leaving a 6" tail. Weave tail through remaining 6 sc and pull up firmly to close the hole.

Body:
Rnd 1: 6 sc into a double loop start and pull the loop
closed (6).
Rnd 2: 2 sc in each sc around (12).
Rnd 3: [Sc in next sc, 2 sc in next sc] 6 times (18).
Rnd 4: [Sc in next 2 sc, 2 sc in next sc] 6 times (24).
Rnds 5-8: sc in each sc around (24).
Rnd 9: [sc in next 2 sc, sc2tog] 6 times (18).
Sew felt heart on.
Rnd 10: [sc in next sc, sc2tog] 6 times (12).
Finish off leaving a 12" tail. Stuff body. Sew body to Rnd 13 of head. Weave in ends.

Ears:
Rnd 1: 4 sc into a double loop start and pull the loop closed (4).
Rnd 2: 2 sc in each sc around (8).
Rnd 3: [sc in next 3 sc, 2 sc in next sc] 2 times (10).
Rnds 4-8: sc in each sc around (10).
Finish off leaving a 12" tail. Pinch ears at base and sew to head. Weave in ends.

Sunday, January 23, 2011

My favorite free patterns: Patches the Carrot Loving Bunny

These little guys are too adorable, especially their tiny little carrots! I made a couple using this pattern, organic cotton yarn and cotton stuffing that I had left over from another project.

I made the following modifications because I had these materials on hand rather than the materials recommended by the pattern:
- size E/4 crochet hook;
- black 8mm safety eyes;
- stitched an "x" for the nose using pink embroidery thread; and
- I left off the patches because I ran out of yarn.

My sons loved them and begged me to make more. Our house is quickly being filled with too many crocheted toys :)

Monday, January 17, 2011

New Crochet Pattern: Fruit

I decided to combine the fruit patterns from my Fruit & Veggie and Learning Colors patterns into one pattern. I also added apple, orange and pear slices, the watermellon from my Picnic pattern and peeled and unpeeled bananas. The result is my new pattern for fruit! If you previously purchased the Fruit & Veggie pattern from my shop and want the updated pattern for free, just send me a convo through Etsy. And if you could please reference in your convo the date you purchased the pattern that would help me find it in my records. Thank you :)

My favorite free patterns: Farmyard Finger Puppets


I found this free pattern almost 3 years ago -- adorable rooster, cow, pig and duck finger puppets. The pattern includes instructions for a dog finger puppet as well. Making items as small as finger puppets is a little tedious but they turned out so cute :) I've had it on my list to make a pattern for hand puppets for years. Maybe this will be the year that I actually get around to it!

Sunday, January 16, 2011

My favorite free patterns: Loop baby rattle


I found this pattern for a baby rattle about a year ago. Even though I didn't have a baby to make it for I had to make a few anyway!!

And I loved the color combination that the designer used :) None of the other color combinations that I made were nearly as attractive.

Saturday, January 15, 2011

Free Crochet Pattern: Heart Shaped Baby Doll


I am having so much fun with this 3D heart pattern!! One of my sons just loves carrying small toys around so I decided to turn it into a miniature doll.

Materials:
Crochet hook size E/4, 3.50mm
Worsted weight acrylic yarn in red (or pink or purple) and peach
Polyester fiberfill
Embroidery floss in dark brown and dark pink
Sewing needle
Yarn needle

Heart Body:
To make the heart I followed the pattern in the link above, but I didn't use the tail of Top A to sew the hole closed between Top A and Top B. I left the hole open because this is where the doll's head will be.
I followed the pattern up to Rnd 7.
Rnds 8-9: sc in each sc around (24).
Rnd 10: [sc in next 2 sc, sc2tog] 6 times (18).
Rnd 11: sc in each sc around (18).
Rnd 12: [sc in next sc, sc2tog] 6 times (12).
Rnd 13: [sc in next 2 sc, sc2tog] 3 times (9).
Rnd 14: [sc in next sc, sc2tog] 3 times (6).
Finish off leaving a 6" tail. Weave tail through remaining 6 sc and pull up firmly to close the hole.
Stuff the heart through the hole in the top of the heart.

Head:
With peach yarn
Rnd 1: 6 sc into a magic ring (6).
Rnd 2: 2 sc in each sc around (12).
Rnd 3: [sc in next sc, 2 sc in next sc] 6 times (18).
Rnds 4-6: sc in each sc around (18).
Rnd 7: [sc in next sc, sc2tog] 6 times (12).
Pause to embroider eyes and mouth onto face.
Rnd 8: [sc in next 2 sc, sc2tog] 3 times (9).
Rnd 9: [sc in next sc, sc2tog] 3 times (6).
Finish off leaving a 12" tail. Stuff head. Weave tail through remaining 6 sc and pull up firmly to close the hole. Sew head to opening at top of heart.

Cap:
With red yarn
Rnd 1: 4 sc into a magic ring (4).
Rnd 2: [sc in next sc, 2 sc in next sc] 2 times (6).
Rnd 3: [sc in next sc, 2 sc in next sc] 3 times (9).
Rnd 4: [sc in next 2 sc, 2 sc in next sc] 3 times (12).
Rnd 5: [sc in next sc, 2 sc in next sc] 6 times (18).
Rnd 6: sc in each sc around (18).
Rnd 7: [sc in next 2 sc, 2 sc in next sc] 6 times (24).
Rnd 8: sc in each sc around (24).
Finish off leaving a 12" tail. Sew cap to head. Weave in ends.

I planned to stop after making the red doll, but they were so much fun that I made the pink and purple ones too :)

Thursday, January 13, 2011

Free Crochet Pattern: Valentine Garland

I found this adorable pattern for 3D hearts and decided to modify it a bit and make it into garland. Here is how I did it:

Materials:
Crochet hook size E/4
Worsted weight acrylic yarn in red, dark pink and light pink
Polyester fiberfill

First I made a chain for the hearts to hang from that was about 6 feet long. Then I alternated big hearts and smaller hearts in shades of red, dark pink and light pink.

I made the big hearts using the pattern I found here, which has a lot of useful photos. After I sewed the two tops together using the tail from Top A, I left that tail hanging on the outside of the heart until the heart was finished. Then I chained 5 with that tail and used it to sew the heart to the 6' long chain.

I made the smaller hearts by modifying that pattern as follows:
Top A:
Rnd 1: 6 sc into a double loop start and pull the loop closed (6).
Rnd 2: 2 sc in each sc around (12).
Sl st in next st. Finish off leaving 10” long tail.
Top B:
Rnd 1: 6 sc into a double loop start and pull the loop closed (6).
Rnd 2: 2 sc in each sc around (12).
Rnd 3 : Sc in next 6 scs, continue to merge Top A and Top B together by inserting your hook into first stitch after sl st made on Top A and continue to make 1 sc in all 12 stitches. Insert hook back into Top B and work 1 sc in next 6 sc (24).
Using a yarn needle and the tail from Top A close the gap between Top A and Top B. Leave the tail from Top A hanging outside of the heart and continue to crochet the heart.
Rnd 4 : Sc in each sc around (24).
Rnd 5 : [Sc in next 2 sc, sc2tog] 6 times (18).
Rnd 6: [Sc in next sc, sc2tog] 6 times (12). Stuff the heart.
Rnd 7: [sc2tog] 6 times (6).
Finish off leaving a 6" tail and weave through remaining 6 sc. Pull up firmly to close the hole and weave in ends.
Using the tail from Top A, chain 5 and then sew that chain to the 6' long chain.

I sewed the hearts to the chain about every 15 chains. Enjoy :)

Friday, January 7, 2011

My favorite free patterns: Lavender bunny


I have been so busy at work lately that I haven't had time to crochet or blog for the past few months. So I thought in the meantime I will share some of the free patterns I have found (and love) over the years.

I found this free pattern a few years ago and just had to make it. I think this little guy is so cute and there is plenty of time before Easter for you to make one too!